
Introduction to Deleting OpenCore Legacy Patcher
If you’ve used OpenCore Legacy Patcher to breathe new life into your Mac but now want to part ways with it, you’re not alone.
Whether you’re troubleshooting, upgrading, or simply moving on, knowing how to Delete OpenCore Legacy Patcher. Deleting it the right way ensures your system stays healthy and boots smoothly, without unexpected hiccups.
Why You Might Want to Remove It
Some users choose to uninstall OpenCore because they’re restoring their Mac to factory settings, selling the device, or switching to a different patching tool. Others may be experiencing bugs or simply want to revert to the original macOS boot method. No matter the reason, understanding the removal process will make everything a lot easier.
Understanding the Uninstall Process
Uninstalling OpenCore isn’t as simple as dragging an app to the trash. Since it interacts with your Mac’s bootloader and system configuration, the process includes removing files from the EFI partition and resetting your boot setup. Doing this wrong could stop your Mac from booting, so follow the steps carefully.
What Happens When You Delete OpenCore Legacy Patcher
Deleting OpenCore Legacy Patcher has some immediate effects, especially if it’s actively running during startup. That’s why knowing what changes to expect can help you plan a clean and worry-free removal.
Effects on Boot and macOS
Once OpenCore is removed, your Mac will attempt to boot using the original macOS bootloader. If you installed macOS using OpenCore on unsupported hardware, your system might not boot correctly, or at all, without OpenCore’s support. It’s important to prepare your system before hitting delete.
Changes to System Configuration
OpenCore makes changes to your Mac’s EFI boot partition and sometimes uses custom kernel extensions or root patches. Removing it will undo these, which could lead to issues with Wi-Fi, graphics, or audio, especially if you’ve installed post-root patches. This is why a safe uninstall is so crucial.
Pre-Uninstallation Checklist
Before diving into deletion, let’s pause and make sure your Mac is ready. Think of this step as your safety net in case anything goes sideways.
Backing Up Your System Safely
Always, always back up your system first. Use Time Machine or an external drive to save your files and settings. If anything breaks during uninstallation, a full backup means you can easily restore everything to how it was before.
Identifying OpenCore Files and Folders
Know what you’re removing. OpenCore’s files usually live in the EFI partition, under a folder named EFI or OC. You might also have leftover files in your Applications folder or system library. Making a list of what’s been installed will help ensure you don’t leave any scraps behind.
How to Delete OpenCore Legacy Patcher Safely
Ready to part ways with OpenCore? Let’s do it the safe and clean way. A proper manual removal ensures you won’t break anything important or get stuck with startup issues. Here’s how to gently undo OpenCore’s changes.
Step-by-Step Manual Removal Guide
Start by locating your EFI partition. This is where OpenCore lives. You’ll need to mount the EFI using a tool like MountEFI or Terminal. Once it’s mounted, open the EFI folder and look for a subfolder named EFI.
Inside it, you’ll likely see another subfolder called OC. That’s OpenCore! Simply delete the OC folder and the BOOT folder next to it. These are the core files responsible for launching OpenCore during startup.
Removing EFI Partition Files
After removing the main OpenCore folders, don’t forget to check the root of your EFI volume for any loose files or backups. Sometimes, older versions or test files are saved here. Deleting them helps prevent confusion later and ensures your Mac doesn’t try to load a half-uninstalled bootloader.
Cleaning Up System and Library Entries
Check your Applications folder for the OpenCore Legacy Patcher app and move it to Trash. Then, go to /Library and ~/Library (your user Library folder) to remove any leftover files or logs tied to OpenCore. While this step isn’t critical for booting, it keeps your system tidy and clears out any leftover patches or configuration files.
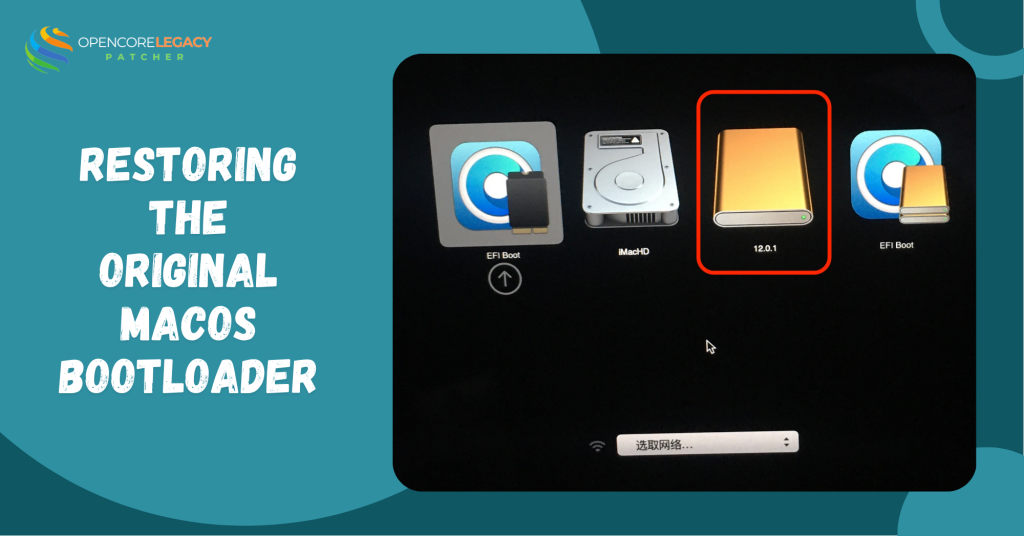
Restoring the Original macOS Bootloader
Once OpenCore is off your system, it’s time to bring your Mac’s original bootloader back to center stage. This step is key if you want a smooth reboot without OpenCore interfering.
Resetting NVRAM and Boot Sequence
Hold down Option + Command + P + R when starting up your Mac. Keep holding for about 20 seconds; this resets your NVRAM, which includes boot settings saved by OpenCore. After this, your Mac should look for Apple’s default bootloader on its own.
Rebooting Without OpenCore
After removing OpenCore files and resetting NVRAM, restart your Mac. If all goes well, it should boot directly into your macOS without loading any third-party patcher. If your system relied on OpenCore to function (like Wi-Fi or graphics on older Macs), it may not work as expected, but at least your bootloader is back to Apple’s original.
Verifying Complete Uninstallation
Let’s double-check that OpenCore is truly gone. A quick look around your settings and disk can confirm whether the removal was successful.
Checking Boot Configuration
Head to System Settings > Startup Disk and confirm that your internal macOS drive is selected as the default. If you see OpenCore or any unusual entries, you might still have leftovers to clear.
Confirming OpenCore Files Are Gone
Lastly, mount your EFI partition again to ensure it no longer contains EFI/OC or EFI/BOOT. Also, give your Library folders a final check. If everything looks clean and your Mac boots normally, congrats! You’ve successfully deleted OpenCore Legacy Patcher.
Common Problems During Uninstallation
Uninstalling OpenCore Legacy Patcher isn’t always smooth sailing. If something goes wrong, don’t panic; these hiccups are fixable with a bit of patience.
Troubleshooting Boot Failures
Sometimes, after removing OpenCore, your Mac might not boot at all or show a black screen. This usually means your system still relies on OpenCore to load patched drivers. In this case, try resetting NVRAM again, and if that doesn’t help, boot into macOS Recovery using Command + R. From there, you can reinstall macOS or repair your disk without erasing your data.
Dealing with Stuck EFI Entries
Even after deletion, OpenCore may still appear as a boot option. This happens when your Mac remembers its previous boot settings. Resetting NVRAM usually clears this, but if it sticks around, use Startup Disk preferences or a tool like bless in Terminal to manually set your macOS drive as the default.
Extend the Life of Your Mac! Patch, Boot, and Run Seamlessly.
Unlock Modern macOS Features on Legacy Macs—Get Started with OpenCore Legacy Patcher!
Reinstalling macOS After Removal (Optional)
If things feel off after removing OpenCore, like missing features or patch-related errors, you might consider a clean reinstall. It’s not always necessary, but sometimes it’s the easiest way to reset everything.
When a Clean Reinstall is Needed
If your Mac relies on OpenCore for basic functionality like display brightness or Wi-Fi, those may stop working after deletion. In such cases, a fresh macOS reinstall helps restore everything to factory defaults without leftovers from the patcher.
Starting Fresh Without Patcher Residue
To do this, boot into Recovery (Command + R), open Disk Utility, and erase your internal disk (if you’re ready to wipe everything). Then, reinstall macOS from scratch. It’ll be like starting with a brand-new Mac, no patcher, no conflicts.
Conclusion: Is It Safe to Remove OpenCore Legacy Patcher?
Yes, it’s safe, as long as you follow the steps correctly. OpenCore doesn’t touch your system files deeply, which means it can be removed without breaking your Mac. Just be cautious if your Mac needs OpenCore to work. Removing it won’t hurt your data, but some hardware features might stop functioning if they were supported through patching.
Deleting OpenCore is like taking off training wheels. If your Mac can handle macOS on its own, great! If not, reinstalling the patcher later is always an option.
FAQs
What is OpenCore Legacy Patcher, and why would I want to delete it?
OpenCore Legacy Patcher is a tool that lets older Macs run newer macOS versions. You might want to delete it if you’re returning your Mac to its original setup or no longer need extra patch support.
Will my Mac stop working if I delete OpenCore Legacy Patcher?
If your Mac uses OpenCore to support essential features, those features might stop working. But your Mac itself won’t break; you can still boot and use it if the OS is supported natively.
Is deleting OpenCore risky for my files?
Not at all. Deleting OpenCore only removes the bootloader; it doesn’t touch your files or documents. Still, it’s a smart move to back everything up just in case.
How do I remove OpenCore from the EFI partition?
Mount the EFI using a tool like MountEFI, delete the OC and BOOT folders inside the EFI directory, then reset your NVRAM to clear boot settings.
Can I go back to the original macOS after deleting OpenCore?
Yes! Once OpenCore is gone, your Mac can boot normally using Apple’s default bootloader, assuming it supports the installed macOS version.
What should I do if my Mac won’t boot after removal?
Try resetting NVRAM. If that fails, boot into macOS Recovery to reinstall or repair your system. A clean reinstall might be needed in rare cases.
Do I need to reinstall macOS after deleting OpenCore Legacy Patcher?
Not always. But if certain features break or you see strange behavior, a clean reinstall can help restore normal performance.
Can I reuse OpenCore later if I change my mind?
Absolutely! You can reinstall OpenCore Legacy Patcher anytime if your Mac needs patching again to support newer versions or features.\
Latest Posts:
- How to Safely Update macOS on an OCLP-Patched Mac Without Losing Data
- Which macOS Versions Are Still Supported?
- Wi-Fi or Bluetooth Not Working After Using OpenCore Legacy Patcher? Here’s the Fix
- Fix GPU & Graphics Issues on Older Macs Running Sonoma/Sequoia with OCLP
- Mac Slow After OpenCore Legacy Patcher? 12 Fixes That Actually Work